For Office365 single sign-on, you need to create 2 applications in your Azure system: one for the front end (the Angular application), and one for the back end (a webservice). The aim is to provide Tecsoft with 5 pieces of data (see Tecsoft example at the end of the e-mail):
- Domain
- Tenant Id
- Font End Client Id
- Back End Client Id
- Back End Secret
And on your Azure side, indicate the url to redirect to the TVTools front end.
Front end
In your Azure portal, please note the main domain (Domain). Register a new application.
Give your application a name, then specify the redirection url https://prod6.tvtools.eu/webaccess/#/microsoft-sso (please change this url to the one indicated in the e-mail that will be sent to you).
Click on “Register” at the bottom of the page.
Please copy the FrontEnd application ID (clientId front end) and the directory ID (tenantId) into a document.
Click “Authentication” check “access token” and “ID token”.
Save your changes (at the top of the page).
Back end
Register a new application. Do not provide a redirect URL, then click “register”.
Copy the Back End application ID (clientId back end) into a document.
(Note: Back End Secret is not necessary for simple authentication, only in case the user needs to access their contacts in the TVTools interface).
Click on “Certificates and Secrets”, add “a new client secret”, then copy this “Back End Secret” into the document.
Click “Expose API” then “Add Scope”.
And just click “Save and continue”
A new window opens, please indicate a name “api-access” for example, then click on “Add scope”.
Click “Add client application” and provide the front end clientId (the id of the azure application you created for the front end). Then check the box below and click “Add app”
Click on “Manifest”, and replace “groupMembershipClaims”: null,
Then “groupMembershipClaims” with “SecurityGroup”.
After modifications, save.
Then, so that the application can access the groups to which the user belongs, it is necessary to add the “GroupMember.Read.All” right.
To do this, in Authorized APIs, click “Add authorization”. Then click on “Microsoft Graph”.
Click “Application Authorization”. Then click on “grant consent”. You should get a green check.
The procedure is completed. Please provide Tecsoft with your data.
Application Impersonation
The account used to generate the token must have impersonation rights and here is how to do it:
- Go to your “Exchange admin center”
- In “permissions” click on “Administrator roles”
- In Administrator Roles, select “Application impersonation” and click the plus “+” to add a role group
- Once named (free naming) in “Roles”, click again on the “+” and add “ApplicationImpersonation”.
- Then click “add” or double-click, then click “OK”
- Then go down to the “Members” table and click again on the “+” in this menu then add the account corresponding to the booking (generally with names like “TVTbooking” or even “TVTOOLS”
- Then click “OK”
Then go to a Powershell in administrator mode from a Windows computer and enter the following commands (using the Office365 admin account and not the account used to manage rooms in the TVTools solution):
install-Module -Name AzureAD
Install-Module AzureADPreview $MySession = New-PSSession -ConfigurationName Microsoft.Exchange -ConnectionUri
https://ps.outlook.com/powershell/ -Credential $AceCred -Authentication Basic -AllowRedirection
import-pssession $MySession
If you are asked to confirm, enter “t” to confirm everything.
When you arrive at the login window, provide the office365 account admin credentials
Then do: import-pssession $MySession
Then enter the following commands, replacing “Room_name” with the email address of the room concerned:
Set-CalendarProcessing room1@domain.com -AutomateProcessing AutoAccept -AddOrganizerToSubject $False -DeleteComments $False -DeleteSubject $False -RemovePrivateProperty $false
Implementation in TVTools WebAccess
Go to the tab corresponding to roombooking on the left pane of TVTools WebAccess

Then select the booking parameters
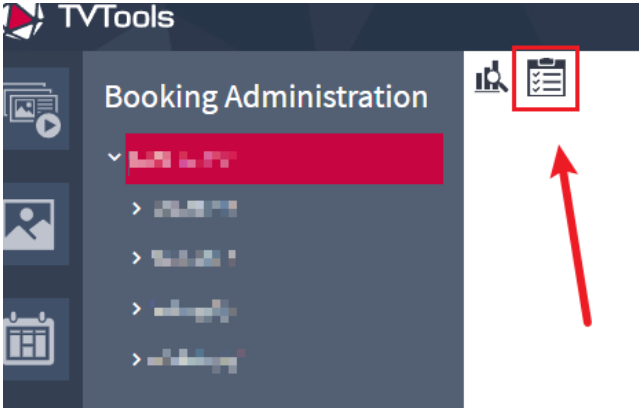
Here you will select (if this is not already the case) type of booking solution: office 365 with user token.
You will then enter the retrieved information in the Microsoft Azure application and you will click on “Obtain office 365 token”.
You should see the text below change and start with “token status: obtained…” with a valid date.
If necessary, contact the support.